Monstering

by sid drmay

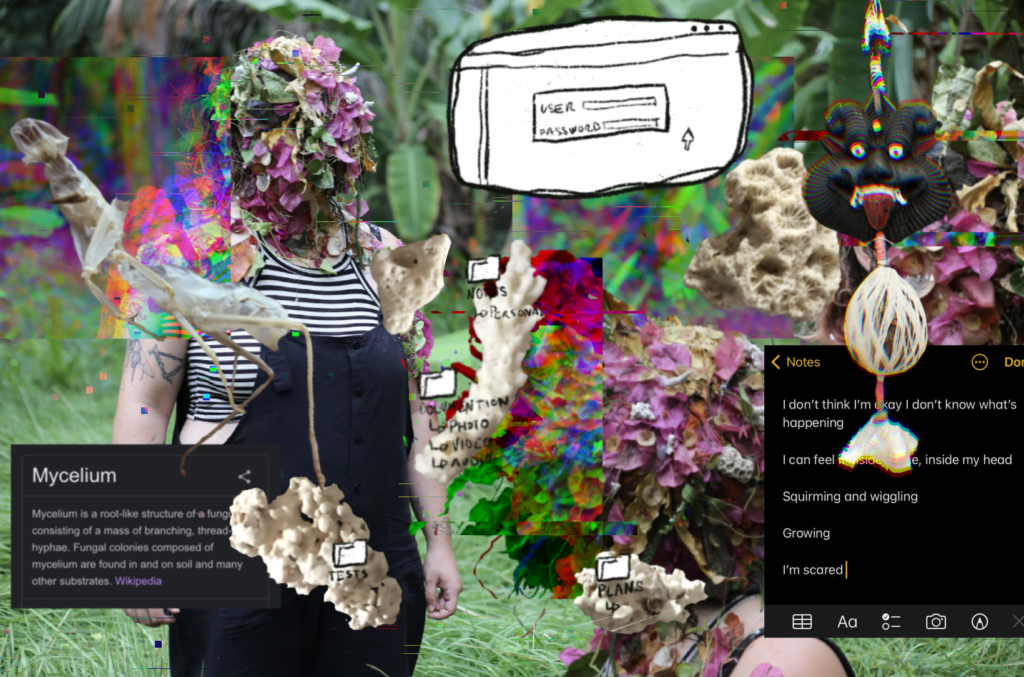
My initial project idea for Dinacon this year was based on wanting to play with ideas of a monster that is controlled by a brain fungus. I thought this would exist as a game of sorts or involved working with Dinasaurs to build different visual experiences with how the monster would look however due to some constraints I ended up being the solo subject. 

I was inspired by Madeline Schwartzman Face Nature projects, seeing all the ways that she uses plants to change her face and express herself has been one of my favourite things.

Batticaloa is full of the most incredible plants, growing all over in a beautiful chaos. The way we were surrounded by unkempt growth around Batticaloa and maintained growth at Riviera was inspiring. 

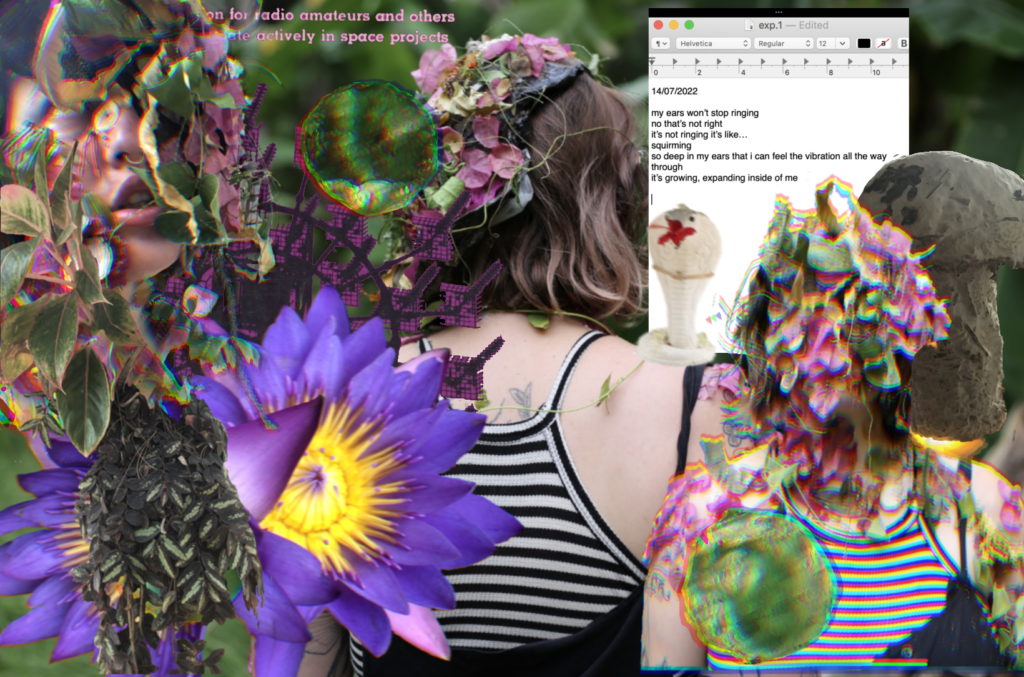
Wandering through the area I found these bright pink petals that had a soft, paper lantern like texture. I knew I wanted to use them immediately. They maintain their colour so wonderfully as they die, becoming lighter pink but still more vibrant than I’ve seen other flowers. Their paper-like qualities become more obvious as they dry out, instead of rotting like other flowers do. 

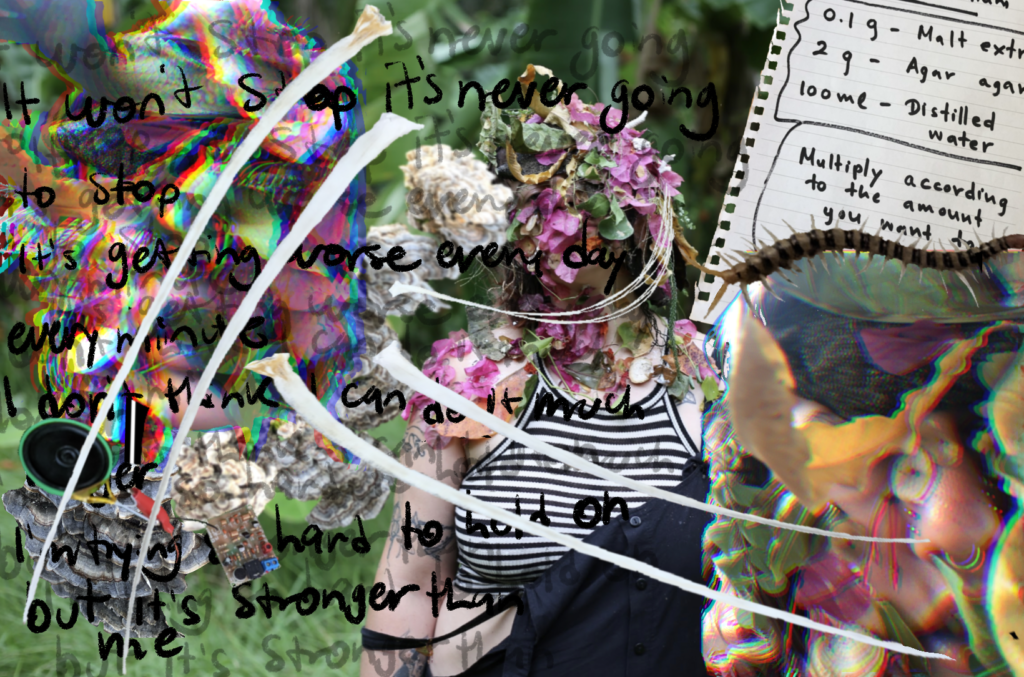
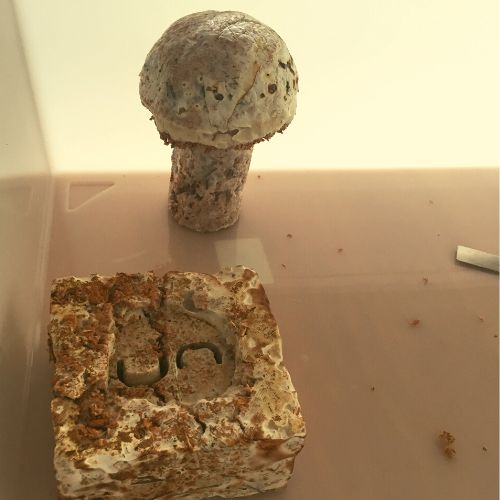
I also utilized turkey tail mushrooms I was able to find near petrified on branches used as fencing outside of some of the homes. I searched for branching pieces of coral on the beach to add further texture and ambiguous origins to the monster. I gathered all the plants, flowers, leaves and coral that I liked the aesthetics of and proceeded to design a headpiece that was the majority of the costume. After that I experimented with a couple iterations of how the monster could look, and found that I really enjoyed using petals to make a scale-like situation down the face that grew with each version. 

Making a monster is many things, but especially knowing that monsters are not always monstrous. Monsters can be beautiful. 

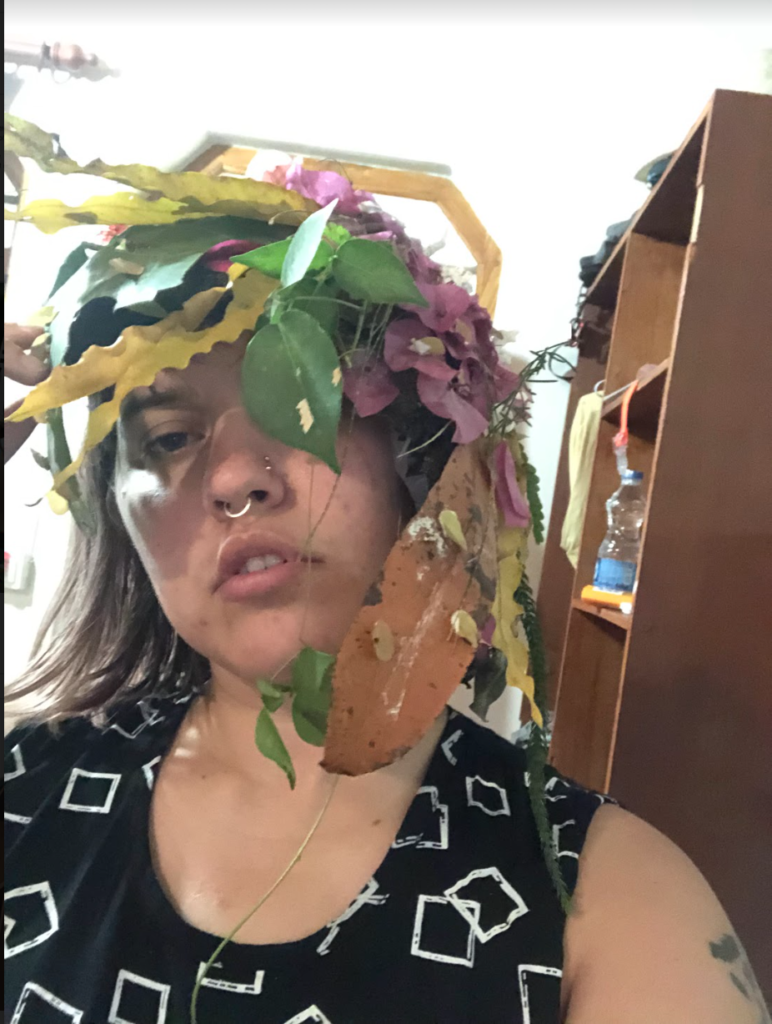
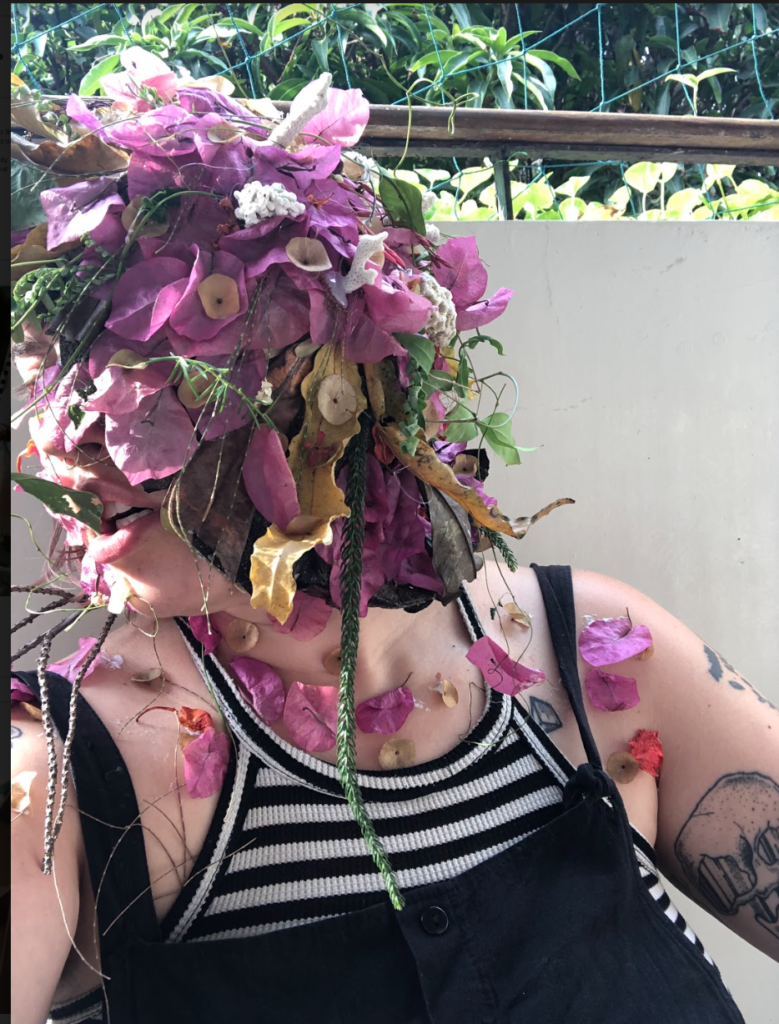
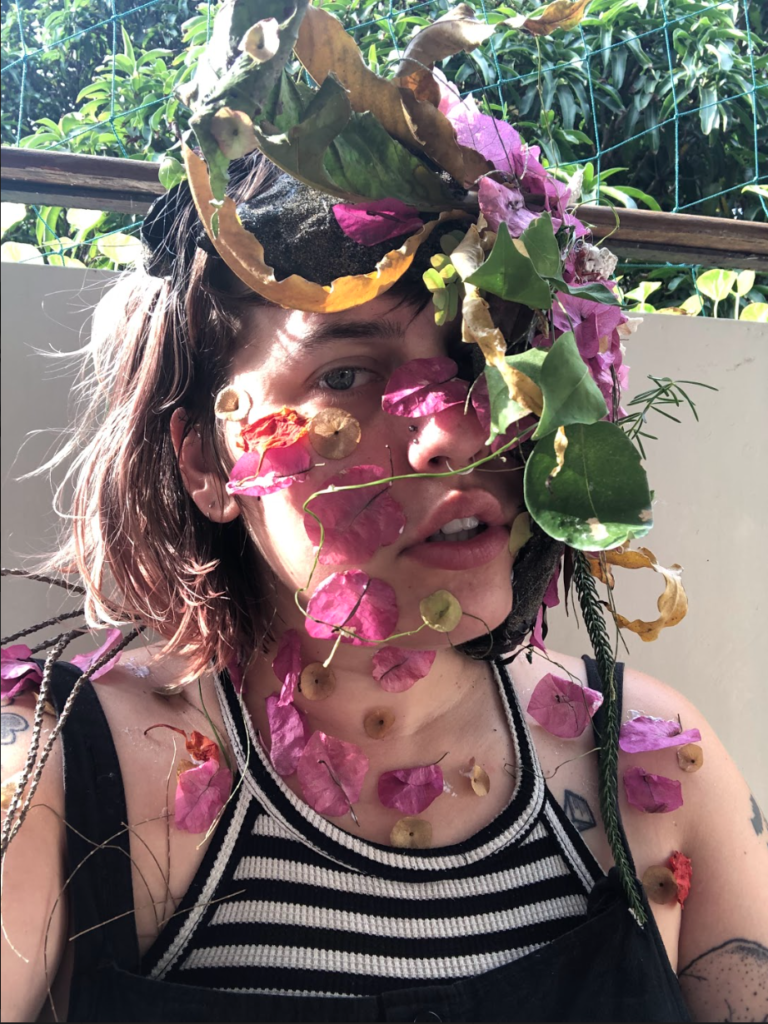
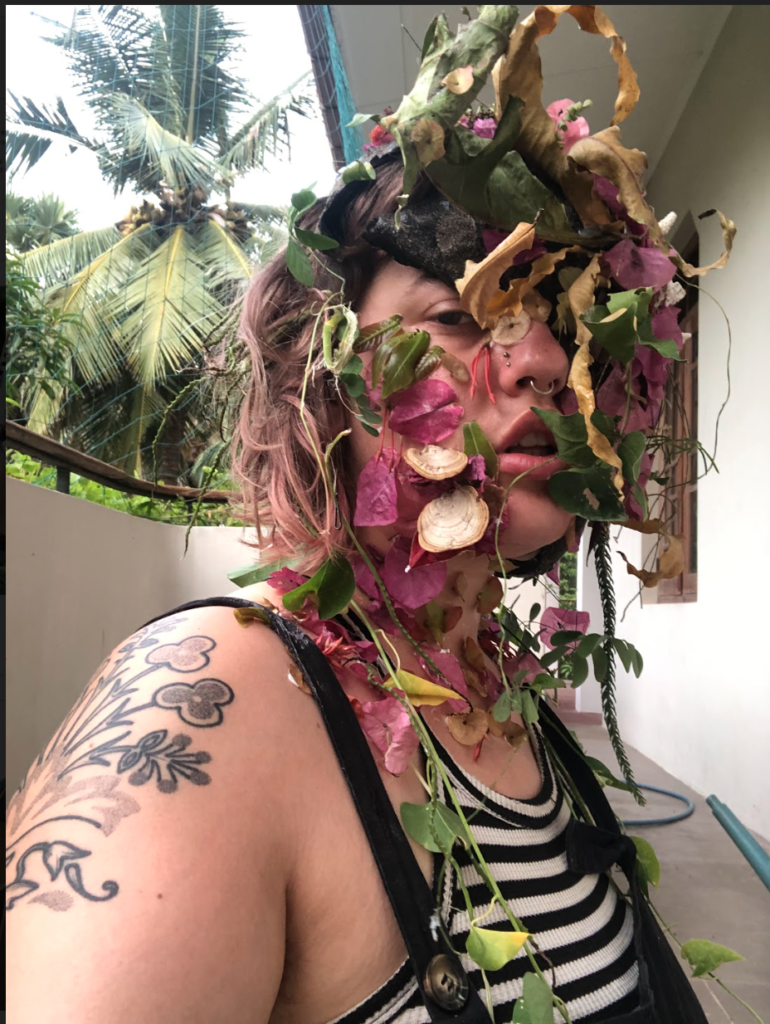
This was something I wanted to utilize, I wanted to show all the beautiful plants and colours that can be found in Batticaloa. Creating tiers of leaves and flowers combined to look like a kind of rippling outer skin. Vines and tendrils swooping down, around the face and body. 

My monster is dripping with layers, flowing down the face, on to the neck and down the body. The leaves, petals and mushrooms work together to create a beautiful, monstrous being that is being taken over by the plants around them. 

Once I had assembled the monster’s look I got photos taken by Luci Dayhew (thanks Luci!!) that I was able to use as the base of the collages. After that I spent time combing through my photos from Batticaloa and pulled elements that spoke to me and arranged them with the monster pictures. The final digital collages can be read as three panels of a story showing the progression of the fungus monster taking over the human brain.

Boids Demo in Bevy

Jay Bond

I went into Dinacon 2022 with the notion that I would make an animal-themed videogame of some sort. It was a very vague goal which quickly became overshadowed by my desire to learn new tools, as I abandoned the fully-featured game engine and programming language I knew well in favour of an engine in its infancy and a language utterly new to me.

The result is a simple tech demo rather than a game, but I learned a great deal in the process and do not regret the choice.

The House Crow

Sri Lanka is home to a wide variety of fascinating wildlife, so the choice of a common house crow as the subject for my project may seem odd. However, I’ve always been attracted to creatures with unique relationships with human populations, and the crows certainly feature prominently in everyday Batticaloa. Their population size may be linked to human waste management problems. We regularly witnessed them stealing food from the endangered sea eagles who were nesting nearby, suggesting that in turn that population size can have an impact on other wildlife as well.

So I began my project with a simple 3D model of a crow, based roughly on photographs I took myself or collected from generous colleagues. I’m not an experienced modeller or animator, so it’s a little rough but suited my purposes.

Boids

As I discussed my interests with colleagues at Dinacon many ambitious ideas arose, such as modelling the social hierarchy of the crows, their interactions with other species, and how their population tracks with human waste management patterns.

However, I settled on modelling flocking behaviour, in part because it is something I always wanted to model in a game engine. I was also surprised to learn from biologists in attendance that the algorithms they used to model flocking behaviours were very similar to those I had heard of used in videogames. It should be said, however, that although we witnessed crows in large groups often I don’t believe this demo to be very accurate to the way those groups move about.

The Boids algorithm was developed in 1986 and has applications in simulations and videogames. It’s also very commonly the subject of tech demos such as this one! The gist of the algorithm is the balancing of three goals for each “boid”: separation, alignment and cohesion. All are based on each boid knowing the nearest bunch of neighbours in the flock. Separation is the goal in which each boid wishes to push away from any other boid that is too close. That is, it keeps them from bumping into each other. Alignment is the goal in which each boid attempts to face the same direction as its neighbours. Cohesion is the goal in which each boid attempts to get near the average position of its neighbours. This condenses larger groups into smaller ones, while separation functions as a counter-balance to keep a minimum distance between them. At each timestep in the simulation, every boid recalculates where it wants to go according to these three goals, and steers accordingly. The results of this very simple algorithm are surprisingly natural and varied.

The basic goals of the Boids algorithm, swiped shamelessly from Wikipedia.

In the demo, each of these goals is exposed as a weight with a slider. You can adjust them individually and observe the resulting change in the flocking behaviour. It sometimes takes a minute for the effects of changes to become obvious, but by varying these weights you can create larger or smaller flocks in tight or loose formations.

Bevy & Rust

The game engine I chose for this project, aptly named Bevy, is still quite early in its development. What attracted me to it was its open-source nature, cross-platform support, and its use of modern programming paradigms. It’s also programmed in Rust, a very new, low-level language which has rapidly gained popularity in the FOSS community.

It stands in stark contrast with Unity, the game engine I have used both as a hobbyist and professionally for more than a decade. Unity is rich with features, but is owned by a large private company and is married to paradigms and a language (C#) which are falling out of fashion. Moreover, Unity’s business practises include a cozy relationship with the US military — something that doesn’t sit well with me, personally. While I cannot avoid it at my day job, I was determined to learn something new at Dinacon, and have enjoyed my experience so far with Bevy.

Downloads

The demo, including full source code and crow asset, can be found at:

https://github.com/HulloImJay/bevy_boids_demo

Intro to Unity Class @ Dreamspace Hive

Jay Bond

In collaboration with Dreamspace Academy’s Software Lab, we ran a 2-day workshop introducing game development using the Unity game engine.

Despite technical woes along the way an amazing group of participants learned to assemble 3D scenes and to create game logic through visual scripting.

MiniSolarPonics

by Fritz Francisco

The main idea was to create a small, sustainable recirculatory water system that enables plants to be watered and fertilized by combining a water system and a plant/soil system, as is commonly done in an aquaponics setup. The aquatic system serves as water reservoir and nutrient source for the soil system, as it eventually would contain water organisms such as fish, molluscs or crustaceans which produce detritus and biological waste products. The water in return is filtered by running over soil and plants which take up the nutrients and assist in clearifying the water. Given that these systems can be difficult to initialize, where the ecosystem must be carefully set up, the project was intended to be modular and extendable to accommodate larger systems as well and be easily scalable.

MiniSolarPonics
## Parts List
- Arduino Uno
- Motor Controller 
- MOSFET
- Electric Air Pump 3.7V
- Diode
- Capacitor
- Solar Panel 12-20V
- Lithium Battery
- Charge Controller (Charge/Discharge)
- Air Tubing
- T-connection for Air Tubing
- Water container
- Soil/Plant container
- Connection wire
- Coconut Husk

## Source Code
https://github.com/fritzfrancisco/MiniSolarPonics

Ethological Observations

seed

by Fritz Francisco

Arriving as a graduate student in the last year of my PhD, the mind is used to focusing on specifics, not to be distracted or to waste precious time. Therefore providing an initial project based on my previous work seemed most promising, goal oriented and efficient. The idea was to implement object detection and automation to design an object/artifact with which animals could interact with. The goal was to study these interactions of animals with a novel object which could be manipulated.
After arriving in a place very distant from my research confinement some aspects already seemed less promising. Electricity was not readily available and internet access was not at all continuous, resulting in limited ability to test and research problems when these were encountered. Therefore, before getting frustrated about something as trivial as internet access the only sensible thing to do was spend time in the more rewarding ocean close by and, more importantly, doing this with others that could get equally excited about finding stuff on the beach or by sticking your head underwater. After seeing what amazing opportunities nature in the direct vicinity had to offer these outings became more regular with daily beach visits and nightly observations in the lagoon.   Being trained in aquatic biology and having worked as a scientific diver it is important to me to get close to nature and experience it directly in person. This lead to a transition from the initial idea to implement a project in which an object/artifact is created which was merely constructed from my previous experience and of interest to me solemnly to something more holistic. It was more important for me to participate in the community and assist where needs could be met, which is why I decided to give swimming and snorkeling lessons, which were further improved by assistance from other fellow experienced Dinosaurs and which was a ton of fun.
I think it is important to make things but also reflect on why we are making these things and what implementations these may have. Teaching is a form of making which can be hard to quantify or document but is as rewarding as any other. Therefore, my project turned from "I have an idea, I want to do this" into "let's swim better and stare at things for a little bit".

Each one, teach one

Smart Farming with LoRaWAN: Lakshantha

Project Description

After scouting through the surroundings of DreamSpace Hive, I came across a Luffa farm and decided to make it ‘IoT-enabled” by hooking up several environmental sensors such as a temperature/ humidity sensor, soil moisture, and a light sensor to an Arduino-based microcontroller (Wio Terminal). Then came the challenge of sending this sensor data to the cloud for visualization. Since communicating via WiFi means you have to deploy the sensors within somewhat close proximity to a WiFi router, the other option was to use GSM. However, I went with using LoRa because it enables communication over very long distances. The sensor data from the sensors were sent to the cloud via a LoRaWAN gateway and the data was visualized on a dashboard. Also, the entire outdoor system was powered by solar.

I set up a SenseCAP M2 LoRaWAN Gateway inside the DreamSpace Hive and was able to receive enough signal strength for the sensors that were set up in the Luffa farm which was located a little bit far away from the gateway. Also, this meant anyone at Dinacon was able to experiment with their own LoRa nodes by connecting with this gateway.

Making Process

First of all, I had to make my project powered on all day long but there was no power outlet near the Luffa farm. So the only option to power it continuously was to use solar. So I hooked up 6 small solar panels (5V/100mA each)

All the solar panels were connected in parallel to obtain a total power of 5v/600mA

After that, I prepared a simple circuit with a TP4056 battery charger, a 18650 battery, and an MT3608 DC-DC Step-Up Converter. The idea was to connect the 18650 Lithium-ion battery to the TP4056 battery charger and connect the solar panel to the TP0456 so that the solar panel will be able to charge the 18650 battery. Also, an MT3608 DC-DC Step-Up Converter was used to keep the output voltage at 5V because the goal was to power the Wio Terminal using a regulated 5V input supply. After testing, I found out that even if the input to this converter changes from 2.7V – 4.2V, the output stayed at 5V. 2.7V is the voltage at which the TP4056 will cut off the battery from discharging and 4.2V is the fully charged state of the battery.

After soldering all the connections, I had a finished circuit. However, I thought of having an enclosure for this as well since it will be exposed outside. So I designed a simple box with a cover using Fusion 360 and 3D printed it!

Also, I had to 3D print a small hanging structure for the Wio Terminal to hang from the wooden plank.

After the box was printed, I placed my connected circuit inside the box. Also, the inbuilt charge indicator LED on the TP4056 board was replaced by a bigger LED which is exposed outside to clearly check the charging status of the battery.

The battery was installed afterward

The regulated 5V output from the circuit above was connected to the 5V pin of the Wio Terminal

Then the connected output from the MT3608 was connected to a Wio Terminal which was also connected to a temperature and humidity sensor, LoRa transceiver, and a soil moisture sensor. After doing a little bit of programming, the entire system was deployed at the Luffa farm.

Finally, all the data from sensors were sent to the LoRaWAN gateway setup at DreamSpace and then that data was pushed to the Helium LoRaWAN network server. After that, the data was sent to Azure IoT Central to easily visualize on graphs!

LoRaWAN with Arduino Workshop

I also conducted a workshop to teach about how to use a microcontroller, connect environmental sensors, code using Arduino and send sensor data to a LoRaWAN gateway!

For this workshop, I used a SenseCap LoRaWAN Dev Kit in combination with a SenseCap M2 LoRaWAN gateway and taught the attendees how to use the Wio Terminal (Arduino-based microcontroller) to view the data from a connected temperature and humidity sensor on the in-built LCD, send the obtained data to the SenseCAP M2 LoRaWAN gateway and then to the Helium LoRaWAN network sever to visualize the data on dashboards!

Mushroom-Mushroom Lamp – Cris Silva

Mushroom-mushroom Lamp was a part of the Dreamfungi project which is a  grassroots innovation project to locally research, develop and produce a biocomposite material using mycelium as an alternative sustainable material for packaging, construction, apparel and accessories industries.

Mushroom-mushroom lamp

Mushroom made out of mushroom (mycelium) material was just a thought that came out from delegates Dinacon 2022 at DreamSpace BioLab.  By the time this idea came in Cris and Pramo already figured out how to make mycelium biocomposites with locally available biomass and fungi. 

Contributors: Cristian Silva (Cris), Pramodya Saumyamali (Pramo), Brian Huang and Tali

How did we make a Lamp?

Making molds for the lamp

Tali and Pramo wanted to make the molds quickly with coconut shells (the cap of the mushroom) and cardboard roll (the stem of the mushroom). A PVC pipe was put inside the cardboard roll to make space for light and wire to go inside the mushroom stem. 

Bio fabrication of mushroom lamp

Cris did the mycelium fabrication of the lamp with molds made by Pramo and Tali. He used Ganoderma fungi to make mushroom lamps with sawdust. After 5 days he took mycelium material out of the molds and let it grow for another few days in a growth chamber. After leaving the mushroom lamp in the growth container it got the distinct colour and texture of mycelium material.

The lamp is growing in the growth chamber

Adding the lights for the lamp

Brian made and gave one of his LED lights from the AnyLamp project. The light was set up at the bottom of the mushroom stem. 

The mushroom-mushroom with AnyLamp

The Fluffynator – side project

Contributors – Cristian Silva (Cris), Brian Huang, Saad Chinoy, Marc Juul

Fluffynator is an old aroma therapy humidifier turned into an automated humidifier for making mushroom objects like the mushroom-mushroom lamp. It facilitates mycelium mat growth on top of the biomass once it is taken out of the mold and placed in the growth chamber.  Arduino Uno, a temperature and humidity sensor (DHT11), LED screen and a switch were used to make the whole hack works with an old humidifier.

work in progress
Fluffynator

How it works: 

The humidifier has five modes and the last mode is the off mode.  The humidifier previously had a touch sensor which was damaged and rusted. It used to be the switch that turns off the humidifier or the change modes. We removed the rusted sensor and connect it to Arduino with a wire. Arduino can change the modes with electric pulses to the IC of the old humidifier. We then add a new switch to Arduino to change the mode to off mode before Arduino Uno and the humidity sensor starts taking measure measurements (every time when we turn on the humidifier by giving it power, we have to press the switch and make sure the humidifier is off (then everything is in synch!).  When humidity is above 70% Arduino sends 5 eclectic pulses to the humidifier to shift through different modes and finally to the off mode. Once humidity is below 70% it again gives a pulse to turn the humidifier on. In this way, fluffynator maintains the humidity inside the mycelium material growth chamber without manual interventions.

Sonic Oar: Ashlin Aronin

Ashlin listening to the singing fish through their sonic oar

Original project description

I’d like to explore the lagoon of Batticaloa and record the sounds of the singing fish with a hydrophone, then create an installation in a public area so everyone can listen to them. I read that local fishermen put the ends of their oars in their ears to amplify the sounds of the fish, so I’d like to incorporate oars into the installation to pay homage to this practice.

How it turned out

Due to the logistical situation on the ground, I had a bit less time than anticipated to finish my project. However, with help from a few friends I succeeded in creating the Sonic Oar.

I had heard that the singing fish were loudest and most active just around the full moon. Though I arrived about a week after that, I found the fish still active around 10pm each night when I started recording. I didn’t do particularly scientific research to determine exactly when they started and stopped, since my project focused on the sounds themselves more than their behavior.

One night I recorded off one of the fishing platforms at the Riviera Resort, dipping my hydrophone just a few feet into Batticaloa Lagoon. It was amazing how immediately their gargling, froggy croaks became audible. There were obviously many fish vocalizing simultaneously. However, with a monophonic hydrophone it was hard to localize how many fish there were or how far apart they were. It would be fun to come back with a stereo pair of hydrophones to get a better sense of how they are moving or not moving and how spaced apart they are. I’ll be bringing a pair of hydrophones on my next underwater recording project!

The next night Lucii and I followed in the footsteps of J.W. Lange and recorded from Kallady Bridge. From the middle of the bridge, we lowered the hydrophone about 15 feet below the water, noticeably deeper than at Riviera. The fish were audible, but there was more background noise from traffic on the bridge, even at that depth. We tried another spot towards the eastern side of the bridge, and the fish were much quieter – in fact, barely audible.

Creating the sonic oar installation itself turned out to be quite simple. I learned from my experience at Dinacon 2 in Gamboa that power is one of the most crucial components of any hacking project. Since I wasn’t sure exactly what would be available in Batticaloa, I brought a battery pack and all the cables and electronics I needed with me. All I needed to do was record the singing fish, load up the recordings onto an SD card, find an oar, and attach the electronics to the oar.

I also learned that when using a Raspberry Pi for media playback purposes, it is helpful to set up a script so that you can load new media files via an SD card without having to boot up and connect to the Pi. Here’s a gist that explains my Raspberry Pi set up. I ultimately included a playlist featuring one of the recordings Betty had made at the full moon from a boat, along with one of mine made from the shore at Riviera Resort.

Electronics set up on the end of the oar

The basic setup for the electronics was a Raspberry Pi with a IQaudio DigiAMP+ hat on it, a 12V battery (behind the oar in the photo above) powering the amplifier and a Surface Transducer from Sparkfun. A startup script on the Pi played back audio files from an inserted SD card, and the sound was amplified through the DigiAmp+ hat and sent through the surface transducer, which turned the surface of the oar into a speaker.

The surface transducer was attached to the blade of a local fishing oar, that I was told was made of mango wood. This was a happy surprise for me, since mango is known for its resonance and is used to make some musical instruments.

Once I got the electronics set up, I was able to hear the recordings through the wood for the first time. I was surprised at how well the sounds transferred through the surface. I used a set of in-ear binaural microphones (which record sound in a way that mimics how our ears do) to record myself listening to the resonance. The audio from this recording is included below, with a video of me listening.

Ashlin listening to the sounds of the singing fish

Overall, I’m pleased with how this project turned out. I think it pays homage to the beauty and ecological curiosities of Batticaloa in a simple way. I wish more people could have experienced the installation, but hopefully this documentation makes it accessible to a few more. Thank you to Shanjeevan for procuring the oar, without which this project wouldn’t be possible. Thanks to Betty for the additional singing fish recording, and thanks to Lucii, Skye, Harold and Andy for their help with installation and moving things from place to place!